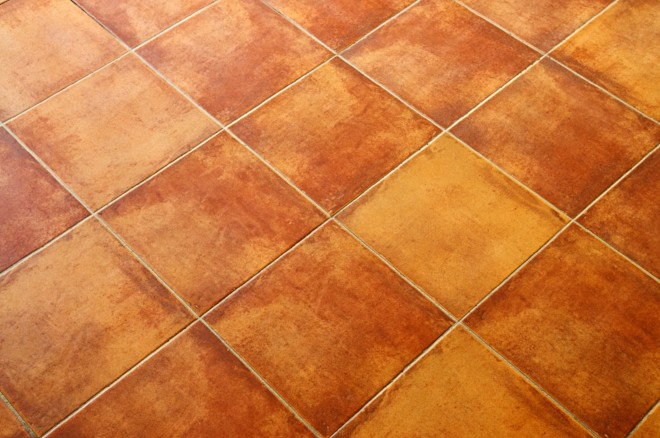
Laying Ceramic Floor Tiles On Chipboard

Chipboard Plywood Painted To Look Like Wood Floor Panels Plywood Flooring Flooring Painted Plywood Floors

Painted Floor On Particleboard Particle Board Floor Painted Floor Particle Board

How To Lay Marble Tiles Diagonally Small Bathroom Tiles Tile Floor Flooring

Different Designs For Your Floor Using Ceramics With Images Patterned Floor Tiles Floor Tile Patterns Layout Patio Tiles

Applying Grout Sealer To The Joints Tile Installation Tile Floor Diy Tile Floor

Sperrholzplatten Hochglanzendes Polyurethan Und Etwas Ellenbogenfett Akid Chipboard Osb Interiors Golv Sovrum

If you install the tile directly over the chipboard it will crack and break.
Laying ceramic floor tiles on chipboard.

12inx24in Porcelain Tile Anderson Sc In 2020 Tile Installation Shower Installation Floor Installation

How To Fix An Uneven Subfloor Diy Home Improvement Installing Laminate Flooring Laminate Flooring Laminate Flooring Diy

Sample Of Wood Sample Of Wood Chipboard Wooden Laminate Veneer Material For Interior Arc Ceramic Floor Tiles Laminate Wood Flooring Colors Flexible Veneer

Painted Particle Board Floor Home Diy Diy Flooring Home

Amdry 2 09 In X 2 Ft X 4 Ft Osb Insulated R7 Subfloor Panel Amd0150g The Home Depot Basement Flooring Osb Flooring

Kenya Anti Slip Kilimanjaro Tile Tile Floor Flooring Porcelain Floor Tiles

Hottest Images Ceramics Tile Showroom Style So You Have Transferred For Your Brand New Condominium Therefore You In 2020 Tile Showroom Ceramic Tiles Tile Installation

Top 60 Best Bathroom Floor Design Ideas Luxury Tile Flooring Inspiration Grey Bathroom Floor Creative Bathroom Design Grey Floor Tiles

Osb Stained Floor With Floor Polyurethane Stained Plywood Floors Osb Wood Painted Plywood Floors
How To Tile Over Chipboard Doityourself Com

Installing Cork Tile Flooring In The Kitchen Cork Flooring Flooring Laminate Hardwood Flooring

Our Sub Floor Is Chipboard Particle Board And I Had To Use Wood Filler To Fill In The Seams And Nail Holes From The Carpe Laminate Flooring Flooring Laminate

Plywood Tiles It Comes In 48 Sheets For About 40 So Thats A Little More Than A Buck A Square Foot And You Ca Plywood Flooring Diy Flooring Flooring Options

How To Remove Tile Mastic Or Thinset The Easy Way Be Your Own Handyman Home Youtube Tile Removal Ceramic Floor Removing Floor Tiles

Pin By Wendy Eley On Home Improvement Flooring Diy Flooring Particle Board

Bleecker Dark Porcelain Wall And Floor Tile 12 X 24 In The Tile Shop Wall And Floor Tiles Tile Floor The Tile Shop

Pier Santa Monica Wood Look Tile Vinyl Flooring Flooring

Dans Le Lakehouse Diy Painted Particle Board Floor Mmmm Teal Paint Particle Board Budget Friendly Renovation Particle Board Floor
3

Florim Stratos Avorio 12x24 Porcelain Floor Tile Oh My I Have A Friend That Is Putting This In He Grey Tile Kitchen Floor Grey Floor Tiles Kitchen Floor Tile

Upcycle House Lendager Arkitekter Floor Recycled Cork Timber Chipboard Flooring Danish Architecture Upcycle

Kenya Silver Ceramic Wall Tile 8 X 24 In The Tile Shop Large Shower Tile Guest Bathroom Renovation Bathroom Remodel Master

Search Results Cottage At Kitka Design Toronto Diy Flooring Stained Plywood Floors House Decor Rustic

1800 Ft Of New Mullican Wood Flooring Wood Floors Flooring Wood

Related Image Osb Furniture Painted Osb Osb Wood

Enhance Beauty And Luxury With Coverlam Nero Ardi A Large Format Marble Look Porcelain Tile In Polished Ceramic Tiles Ceramic Roof Tiles Beautiful Tile Floor

Stair Tile Ideas With Tile On Stairs Landing Home Ideas Pinterest Tile Stairs Stair Renovation Stairs

Grey Ceramic Tile In A Shower Done Vertically With Mosaic Glass Accent And 2x2 Mosaic S Ceramic Tile Bathroom Shower Ceramic Tile Bathrooms Shower Tile Designs

Pin On Floral Crib Bedding Sheet

How To Pull Up Carpet And Paint A Subfloor To Look Like Aged Wood Painted Wood Floors Diy Flooring Master Bathroom Makeover
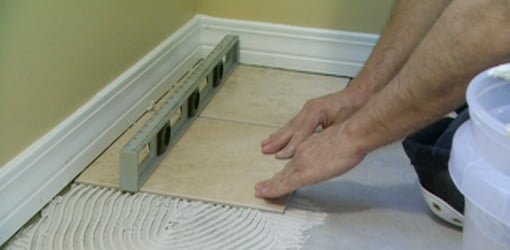
Can You Lay Tile Directly Over A Plywood Subfloor Today S Homeowner
Komi Ceramic And Porcelain Tiles Wood Effect Centura

Our Basement Bathroom Reno Porcelain Tile Floor Lowes Galvano Charcoal 12x24 Dove Gray Grout Bathroom Flooring Cleaning Bathroom Tiles Tile Bathroom

Photo Features Linden Point By Daltile In Grigio 12x24 Daltile Dal Tile Porcelain Tile

Home Dzine Home Improvement How To Tile A Kitchen Floor Kitchen Flooring Flooring Laying Tile Floor

Melamine Face Chipboard Mdf Plywood Malaysia Nilam Makmur Mdf Plywood Plywood Melamine

Particle Board Floor How Did They Make This Look So Pretty Home Home Renovation Updating House

These Large Format Multi Chipboard Tiles Are A Creative Interior Designers Dream This Design Is Hard Wearing Chipboard Interior Flooring Interior Wall Design

Alsacia Rustic Porcelain Tiles Exterior Alsacia

Heritage Corner Hearth Pad Natural Silver Slate Type 1 32 X 32 Hearth Pad Hearth Pads Stove Installation

Vetro Is The New Wall Tile Series Based Around The High Gloss Finishes And Colours Of Glass It Comes In Four Ceramic Tiles Wall Tiles Design Bathroom Trends

Best Photos Ceramics Tile Installation Style So You Ve Migrated Within The Brand New Condominium And You Also Uncov Tile Installation Ceramic Tiles Tile Steps

Wheatside Blue Ceramic Tile Ceramic Tiles Blue Ceramics Ceramic Roof Tiles
3
Source : pinterest.com
